Wednesday 16 October 2013

Installing ASP.net

1.  Open the start menu (windows button on the bottom left of your screen) and use the search bar to search "turn windows features on or off".


2.  Click the check box beside .NET Extensibility, ASP, ASP.NET.


3.  Start IIS Manger.


4.  Place the desired ASP file in "C:\inetpub\wwwroot".


5.  To view the file, type in localhost/(filename).aspx, in my case it was "http://localhost/dropdowndemo.aspx".


.

Installing PhpMyAdmin

1. Go to "http://sourceforge.net/projects/phpmyadmin/files/phpMyAdmin/4.0.8/phpMyAdmin-4.0.8-english.zip/download#!md5!6e8412da7e1709f90b8f3182dbecbca8".

2. The download will start automatically.

3. Open the zipped up file.

4. Extract the file to Apache's htdocs directory, found at "C:\Program Files (x86)\Apache Software Foundation\Apache2.2\htdocs"

5.  now shorten the name of the directory to          "phpmyadmin" by right clicking and selecting       rename.

6. now type "http://localhost/phpmyadmin/phpinfo.php" into your browser, a screen like the one to the left should appear. You may also replace localhost with the name of your website, such as myfirstphp.tbd.

Tuesday 15 October 2013

Installing an FTP Server and creating users

1. Go to "https://filezilla-project.org/"

2. Click Download FileZilla Server.

3. click FileZilla_Server-0_9_41.exe

4. Save and run the file

5. Click I Agree


6. Click Next

7. Click Next

8. Click Next

9. Click Install

10. Click Close

11. Click OK

12. click on the icon which has an image of a person on it.

13. click add.

14. Fill in preferred username


15. Click Ok

16. Click on Shared Folders on the left panel 
 

17. Click Add under the Shared Folders section

18. Navigate to a directory you want to share and click Ok. You can edit the read, write, and delete permissions for users as shown under the Files heading.


19.Then you can click Add again  to add another user and then specify a new directory for this user by repeating step 17 and 18.


Installing IIS and Creating Hosts

1. Open your control panel.

2. Click on Programs.

3. Click on "turn windows features on or off".

4. Select "internet information services".

5. Click OK.

6. Wait for the feature to turn on.


7. Open the start menu and search "IIS". Open "Internet Information Services (IIS) Manager"


8. On the left menu click on "Sites" and then select Default Web Site. Click Start on the right menu to start the site.


9. Go to your browser and search localhost. If everything is configured properly you should see the screen to the left.


10. Go back to IIS and click on "Add Web Site..." on the left menu.
11. You should see the form as shown to the left. For site name you must choose a unique name for your site, for physical path you must choose a path where your site content will be located (typically "c:\inetpub\wwwroot" and then for Binding you must assign the site a unique address. For this example I used my IP address. Click OK.


12. Test your site configuration by going to your browser and searhing the unique address you assigned the site in step 11.


13. To configure anymore sites you can simply go to "Add Web Site..." again and fill in unique identifiers for the new site you are configuring (as shown in step 11) and then visit the unique address in your browser (as shown in step 12).

Monday 14 October 2013

Installing PHP 5

1. Go to "http://windows.php.net/download/#php-5.3" .

2. Scroll down to the tread safe section(VC9 x86 Thread Safe).

3. Click on Installer.

4. Save and run the file.

5.  On the first setup screen click next.

6. Click that you accept the terms of the agreement and click next.

7. Click next.

8. Click apache 2.2.x module and click next.

9.Click next.

10. Click next.

                                                                                    11. Click Install.

12. Click finish.

13. Open notepad and inset the following code.
<?php
phpinfo();
?>
14. Save the file as  phptest.php into htdocs for Apache.

15. Restart Apache.


16. Enter "http://myfirstphp.tbd/phptest.php" into the address bar, a screen like the one above should appear.


Installing MySQL

1. Go to your address bar and type in  "http://dev.mysql.com/downloads/mysql/5.5.html#downloads".


2. Scoll down and click the download button beside the apropriat msi installer (in my case "Windows (x86, 64-bit), MSI Installer").


3. Scroll down and click "No thanks, just start my download."

4. Save and run the file.

5. Click next in the first setup screen.

6. Accept the terms in the license and click next.

7. Select typical install

8. Click install.

9. Click next.

10. Click next aqain.

11. Click finish.

12. Now the Server instance configuration wizard will pop up, click next.

13. Select detailed configuration and click next.

14. Select Developer machine and click next.

15. Select multifunctional database.

16. Click next.

17. Click next.

18. ensure the port number is set to 3306 and add firewall exception is clicked.

19. click next.

20. click next again.

21. Enter a root password and click next.

22. click execute.

23. click finish.

Installing Apache and configuring virtual hosts

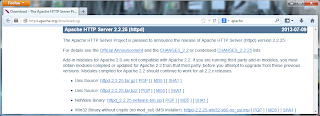
1. go to http://httpd.apache.org/download.cgi and scroll down until you find Apache 2.2.25 then  click on httpd-2.2.25-win32-x86-no_ssl.msi.
 
2. Save and then run the file.

3.The installation wizard should appear, press next.

4. accept the terms of the license agreement and press next again.

5. At the `Read This First`section, click next again.

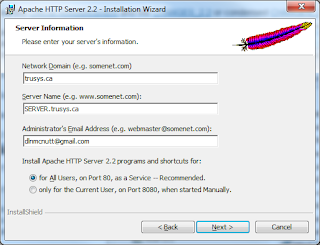
6.fill out the necessary server information, like to the left. Click next again.

7. Select custom install and click next.

8. At the custom setup page, click next.

9.  At the ready to install program page, click install.

10. Wait for installation to complete
, then click finish.

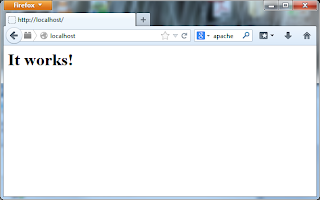
11. To test Apache, open a browser and type local host into the address bar.

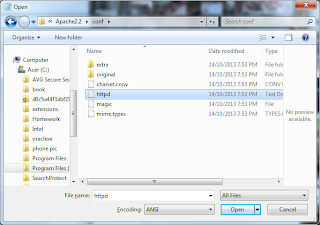
12. run notepad as administrator.

13. click on file and the open.

14. navigate as shown on the left (ensure all files is selected).

15. select httpd and open it.


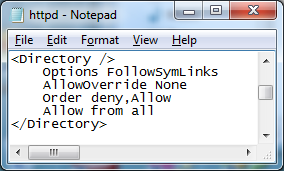
16.Scroll until you find the directory that has  "options FollowSymLinks" in the first line.

17. Modify it so that it matches the image on        the left.
    
18. Scroll to the bottom of httpd.


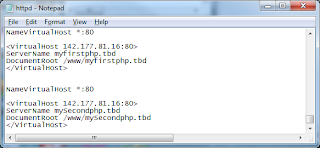
19. Insert the code to the left.

20. replace 142.177.81.16 with your IP                address.

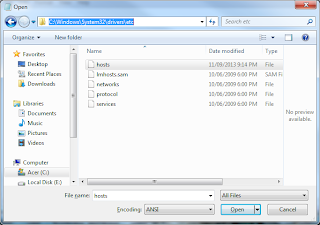
21. replace myfirstphp.tbd and  mysecondphp.tbd with domain names of your     choosing.

 22. Click file ad then open.

23. Navigate to the etc directory through the        path shown to the left (ensure all files is               selected)

24. Select hosts and then click open.

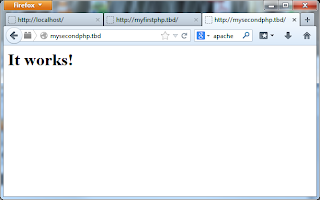
25. add two lines at the bottom of the file,            each line consisting of 127.0.0.1 and the name       of your website.

    
26. Now test you sites.